How to Work Securely with Microsoft Office
Microsoft Office is widely used in business environments to create documents, spreadsheets, presentations and other collateral.
What many organizations fail to realize, however, is that sensitive business information can sometimes be compromised when employees share Office documents with customers by publishing them on the Internet.
Protecting the confidentiality and integrity of an organization's information assets should be a high priority. Ensure that by educating users about how to effectively utilize the security and privacy features of Office programs such as Word, Excel and PowerPoint.
Inspect Before Publishing
Office documents often contain hidden information, called “properties,” that can indicate who created or last modified the document, who that person's manager is, the name of his or her company and so on. While such information might seem harmless at first glance, it's not. For example, knowing the name of an employee and that employee's manager's name can provide a crafty outsider with enough information to launch a social engineering attack. (If there’s any doubt that this is a concern, read The Art of Deception by Kevin Mitnick.)
But what can be done about this? Try using Document Inspector, a feature of Office programs that allows the removal of document properties, comments, revision marks, headers, footers and any other hidden text embedded in a document. To open Document Inspector, click the File tab, select Info, click Check for Issues and select Inspect Document, as shown here:
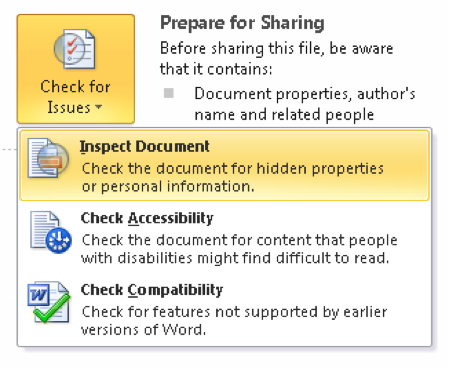
Document Inspector allows the removal of all or selected metadata from documents to prevent information leakage.
Sign and Seal Before Delivering
A policy, agreement or other document usually isn't considered "official" unless it's been signed by someone of authority. Digital signatures carry even more weight because they not only ensure the document is authentic but also guarantee it hasn't been tampered with in transit. Digitally signing a Word document or Excel spreadsheet requires a valid digital certificate from a certificate authority, but office workers normally don't have to worry about that because the company's IT staff handles it.
So how can you digitally sign a Word document? Select the Insert tab, then in the Text tab group, click the Signature Line button and click the Microsoft Office Signature Line, as shown here:

In the Signature Setup dialog that appears, type your name, title and any other information required. Then click OK to add a blank signature line into your document. Double-click on the blank signature line to open the Sign dialog, type your name (or select an image file of your signature) and the document is now official:

Note that if a smart card is needed to log on to your computer, you may be prompted to enter the PIN for the card during the signature generation process.
Keep It Confidential with Encryption
Want only certain designated individuals to be able to read your document, spreadsheet or presentation? Office programs allow this by enabling document encryption through use of a password. Of course, any password encryption scheme may be susceptible to brute force attack, so choosing a sufficiently long and complex password is important. In fact, Office 2010 lets network administers configure a policy that forces users to specify an encryption password that meets the same minimum requirements as a Windows logon password.
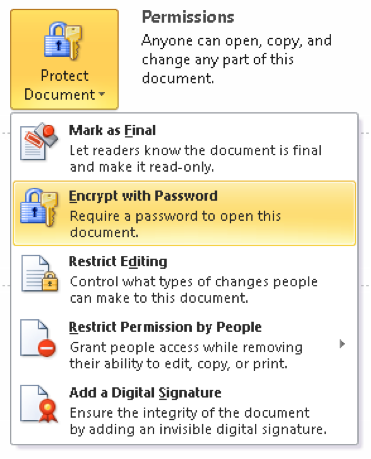
To encrypt a document, click the Home tab and select Info, then click Permissions and select Encrypt with Password, as shown here:
Take Control with Editing Restrictions
People often work in teams in business environments. For example, Alice might create a document, Bob might edit it, Carol might review it and Dave might authorize it for release. Such scenarios are common, but what happens if a document is placed on an insecure share or team site? Let’s say someone else stumbles across it and shares it with a friend who tells his neighbor who passes it to a competitor, and suddenly the secret business strategy is in the wrong hands.
Sensitive business documents should be restricted so they can be accessed only by those authorized to view or edit them. One way to do this is to store such documents on file shares or SharePoint team sites with permissions that allow access for certain users while denying access for others.
But what if there’s a need to allow someone to read a Word document and add comments but not make any other changes to it? NTFS permissions can't handle such granularity, but the Editing Restrictions feature of Word 2010 easily allows it. Simply click the Home tab, select Info, click Permissions and select Restrict Editing. This opens the Restrict Formatting And Editing pane on the right side of the document with the option to allow only certain types of modifications to the document:
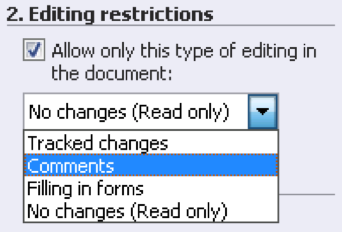
Click the More Users link to specify which users this restriction should apply to. Once the necessary editing restrictions are configured on your document, click Start Enforcing Protection and specify a password:
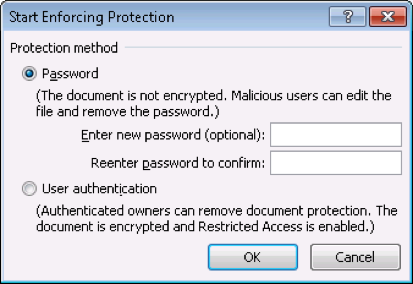
Users who try to open the document will then have to supply this password before they can edit the document, and the editing actions they can perform will be restricted to those specified for them.
To IRM or Not IRM?
When clicking Protect Document on the Info page of the Home tab, there’s an option called Restriction Permission By People.
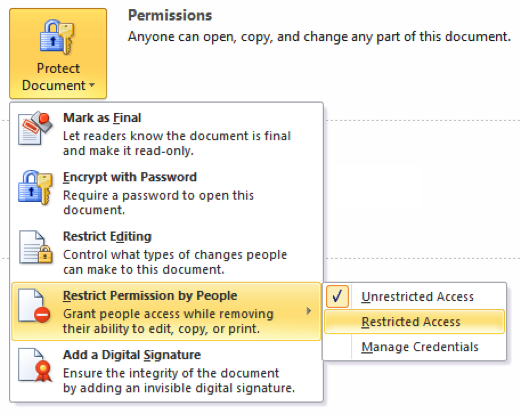
It’s part of Office's Information Rights Management (IRM) feature, which lets users apply access permissions to Office documents that can prevent them from being copied or printed by unauthorized individuals. IRM is an effective way of safeguarding documents because it's enforced regardless of where the document is stored, copied or transmitted; the IRM information is embedded within the document file itself.
Implementing IRM in a business environment requires that users have access to a Rights Management service that can be used to authenticate the credentials of individuals who create, edit, transmit and receive documents. Office 2010 IRM works with Windows Live IDs. But for greater control, deploy the Rights Management service using the Active Directory Rights Management Services (AD RMS) role of Windows Server 2008 R2.


